Installation Enterprise Glossary
Checklist
Please make sure that the following components of the IIS web server are present, especially if an existing IIS web server is used:
.NET Framework functions 4.6 or newer
ASP .NET 4.6 or newer
Windows authentication
WebSocket-Protokoll
Administrative Service
Requirements: Web Deploy
Please note that Microsoft's Web Deploy 3.6 must be installed beforehand. This simplifies the deployment of web applications and web pages to IIS servers.
Detailed information about installation and configuration can be found in the following article: Configuring a Web Server for Web Deploy Publishing (Web Deploy Handler).
Requirements: ASP.NET Core 6 Runtime - Windows Hosting Bundle
The ASP.NET Core 6.0 Runtime - Windows Hosting Bundle must be installed on the web server.
1. Start Installation
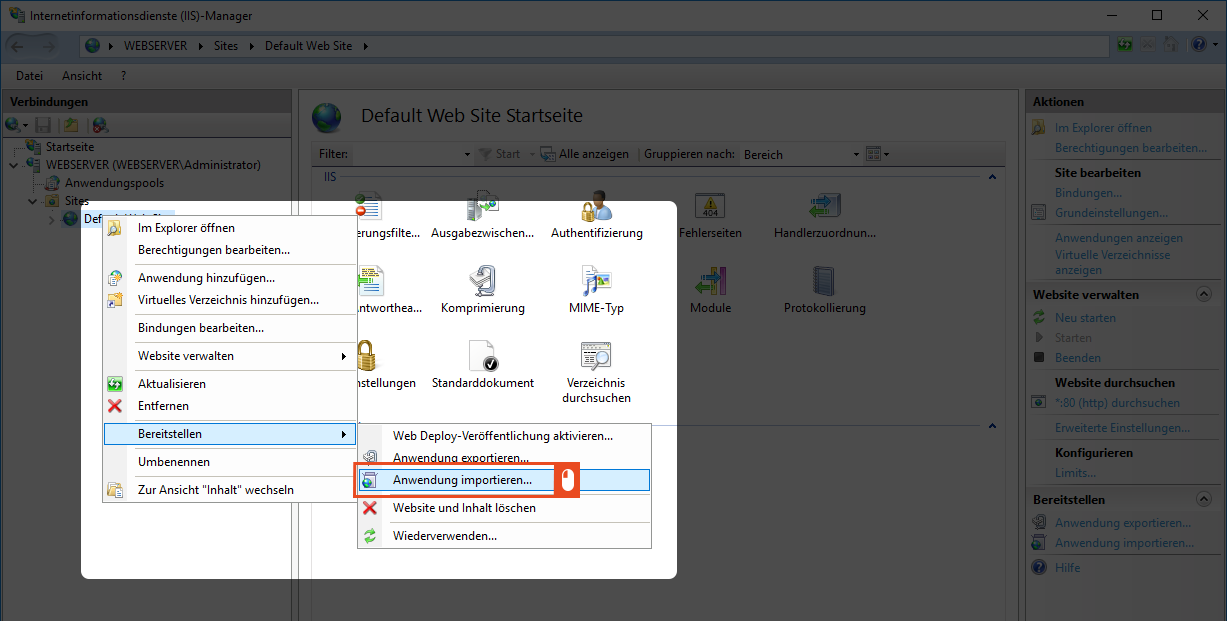
To download the software, a link to a zip file is provided by email (e.g. EnterpriseGlossary_2019.1.19.zip). Download this file to the target computer. You start the installation of the Enterprise Glossary via the Internet Information Services (IIS) Manager. There you will find the Default Web Site under Sites. Here you make a right-click on the menu item (Default Web Site).

This will take you to the Deploy function. In the next step, select Import Application.
2. Select Zip File
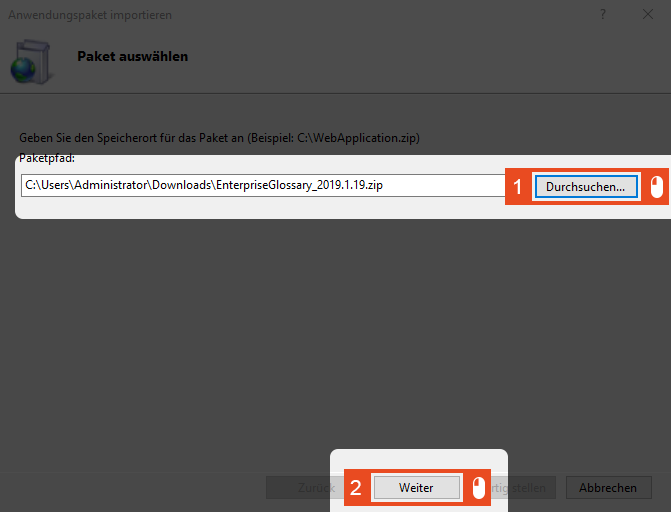
A new window will open where you enter the path to the zip file. Here, select Browse and the corresponding zip file. After that, click Next.
3. Select Packages
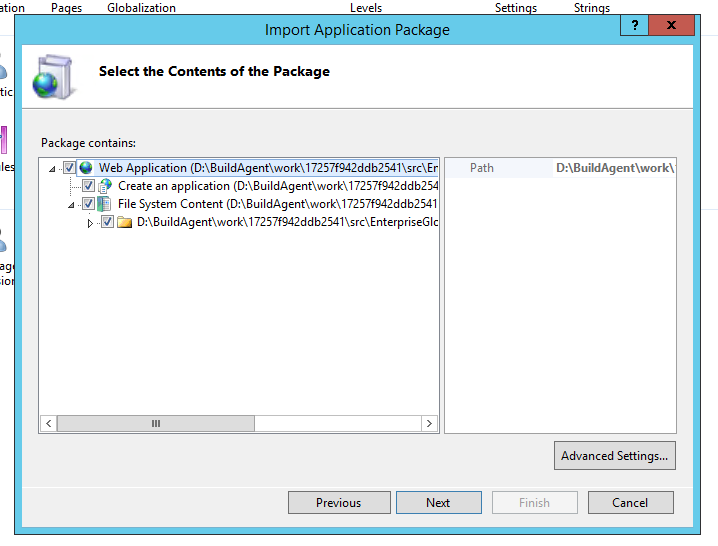
A new window opens where you can select the contents of the packages. In the default installation, all checkboxes are selected. This setting should not be changed. After that, click Next.
4. Application Path
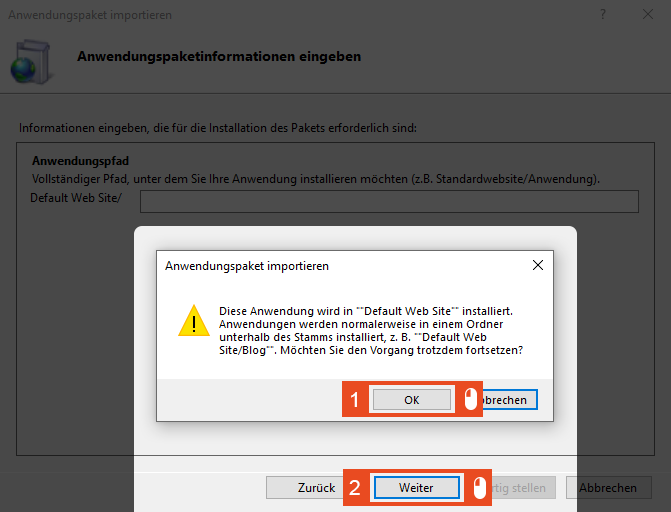
In the next step you will be asked if the application path should be customized. In the default installation, the application path is always EnterpriseGlossary. If you want to install the page on your Default Web Site, you have to delete the word EnterpriseGlossary here.
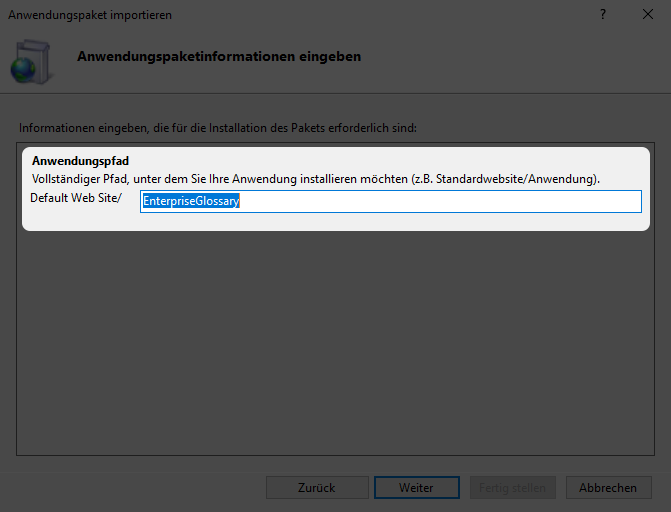
If you leave this field blank, a warning from the system will appear. This step can be confirmed with the Ok button and then with Next.
4.1. Customize Application Path
Optionally, the Application Path can be changed and confirmed with Next. An application can be configured completely autonomously and is installed in a special application path. This allows the installation of multiple applications within one website. As a consequence, when updating the application, the update has to be performed from the parent website, and the application path always has to be specified.
If you choose to customize the application path, you must also customize the index file. Follow the instructions in step 5.1.
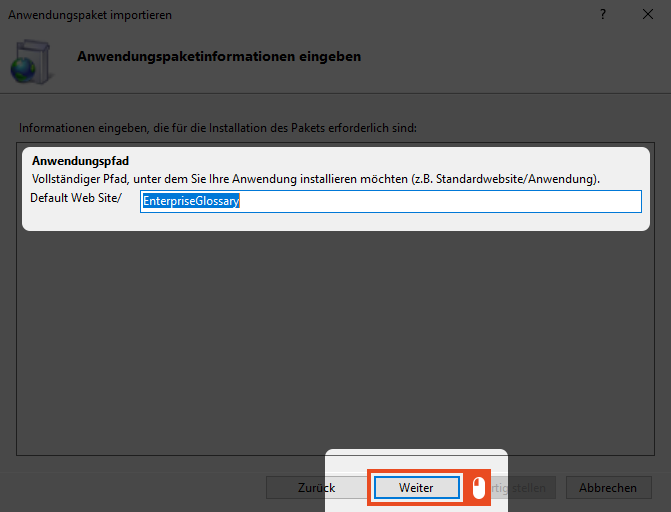
5. Finish Setup
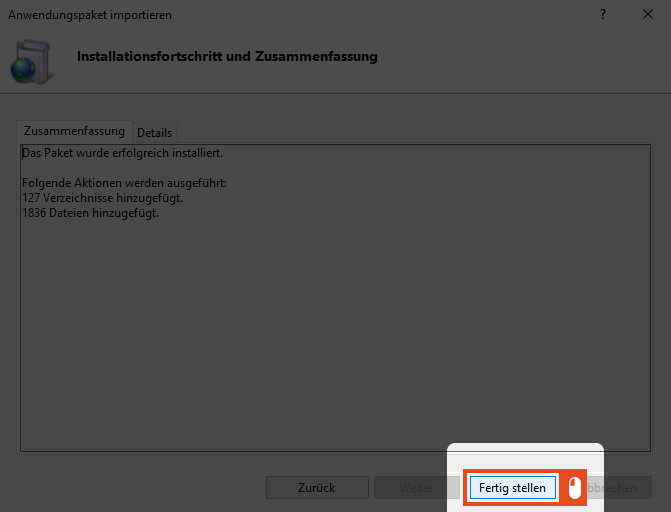
Complete the installation process by clicking Finish.
5.1 Customize index file
Only relevant if you chose to customize the application path in step 4.1.
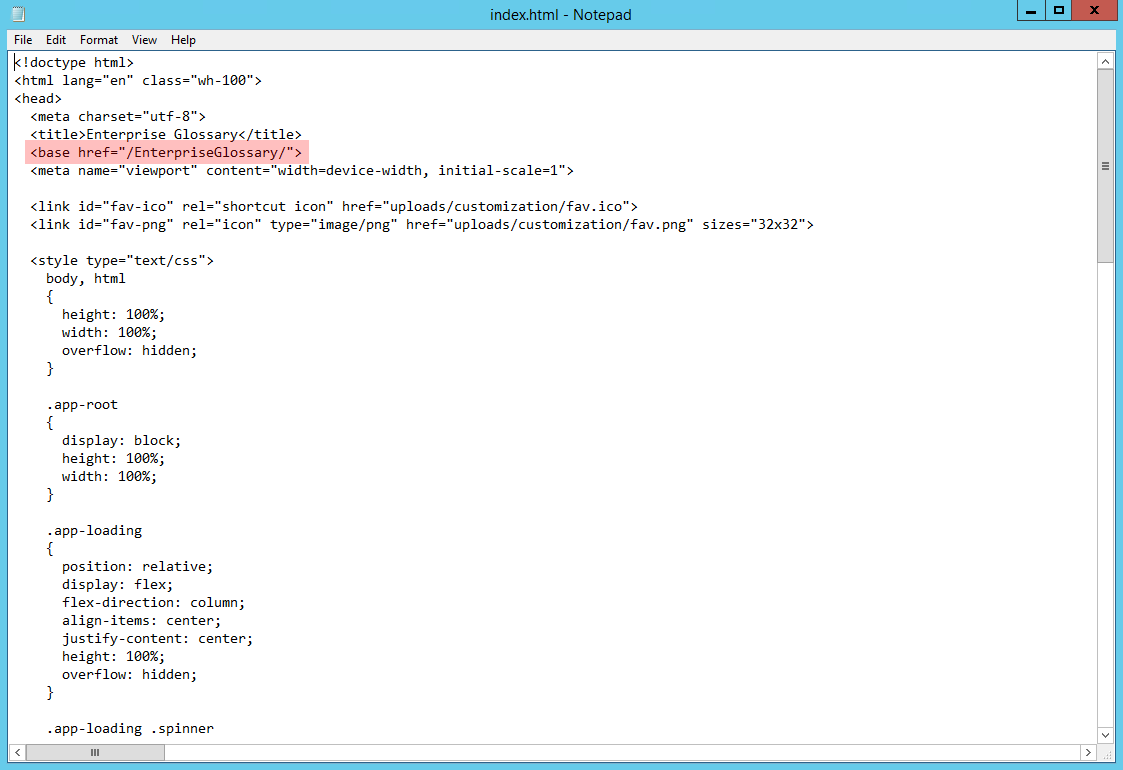
If you have adjusted the application path in the previous step (4.1), the index.html must be adjusted after completing the wizard. The index.html is located under ClientApp\dist.
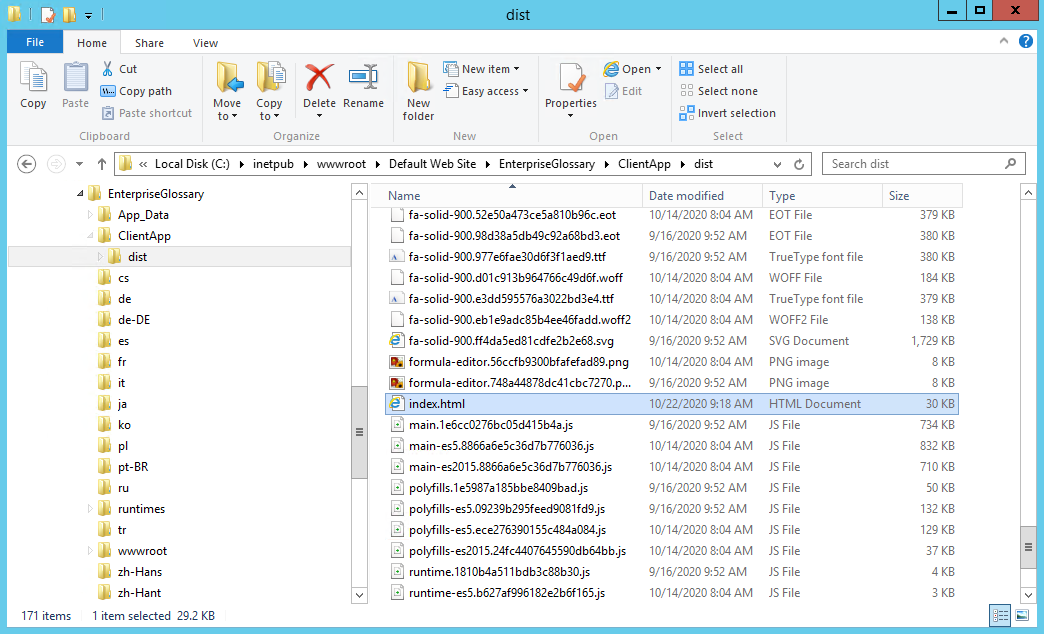
Initially, the Index.html looks like this:
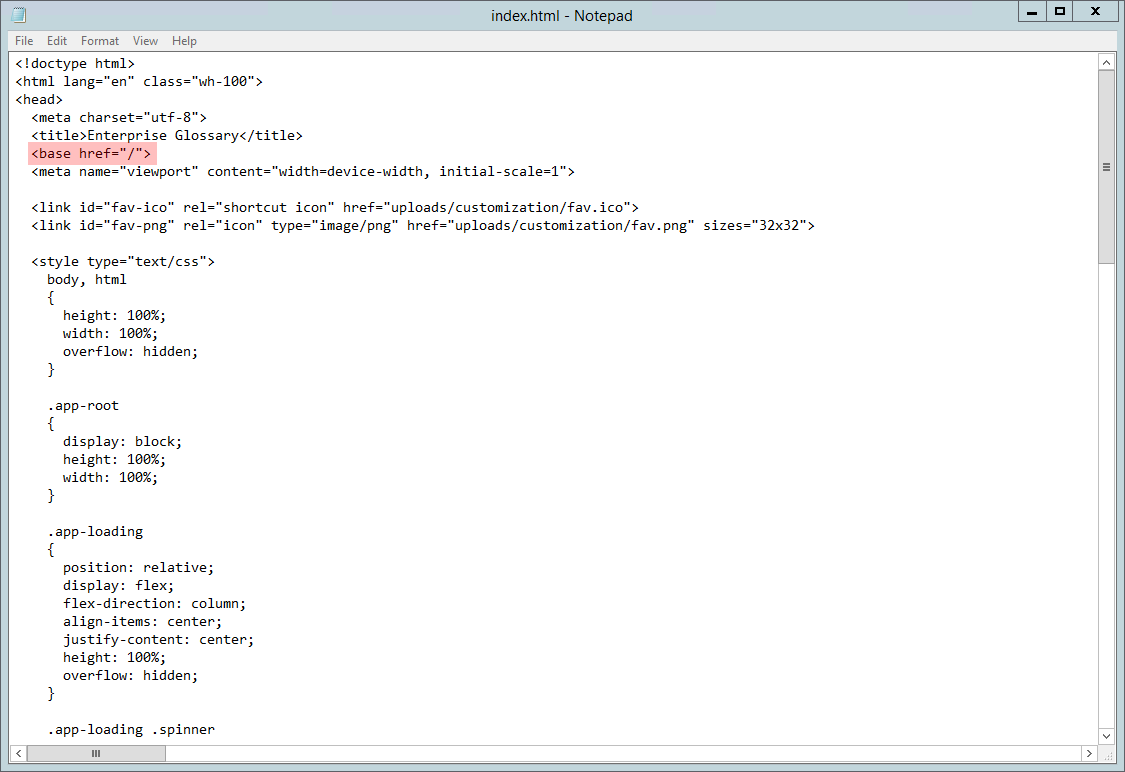
The <base href = "/"> must be changed to <base href = "/application path/">, for example, <base href = "/EnterpriseGlossary/"> if "EnterpriseGlossary" was selected as the application path.
6. Authentication
First select the Default Web Site, and then select Authentication from the Internet Information Services (IIS) Manager menu. If you have customized the Application Path (as described in step 4.1) you must select the application accordingly.

Please make sure that both Anonymous and Windows Authentication are enabled in the status column.

7. Advanced Settings
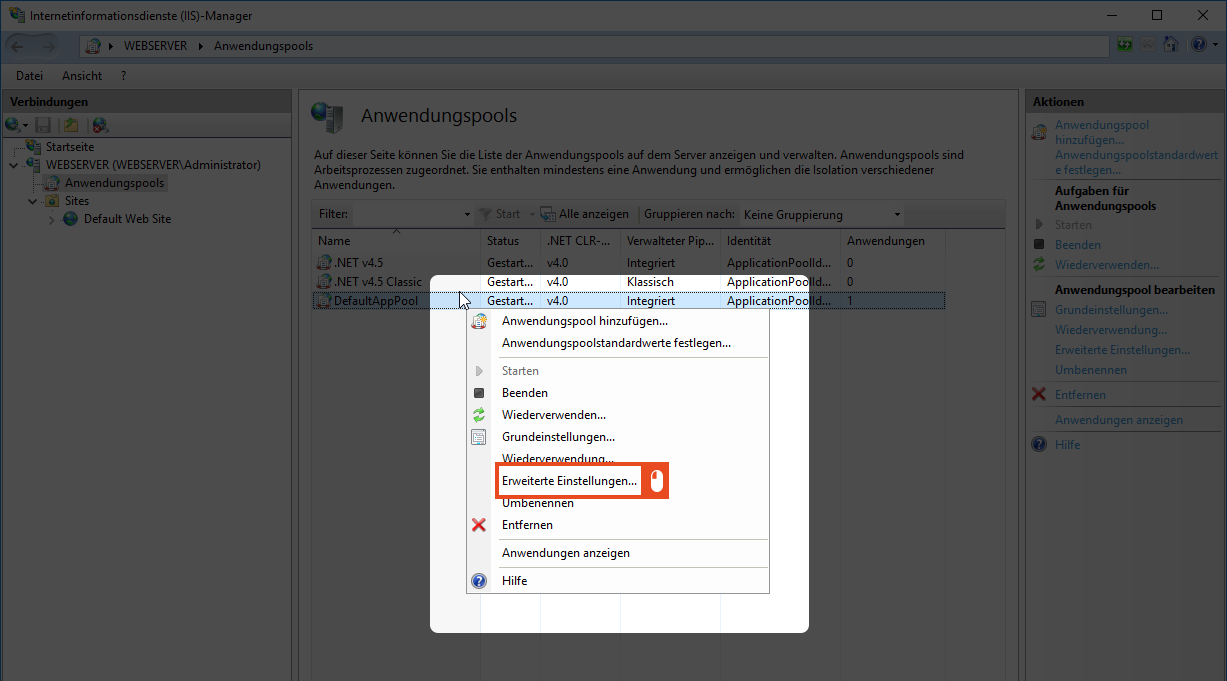
On the left side of the IIS Manager, under Connections, you will find the sub-item Application Pools. Right-clicking on the DefaultAppPool menu item displays another selection list.
Tip
If several websites/applications are operated on the web server, it is recommended to create a separate application pool.

Select the Advanced Settings... option.
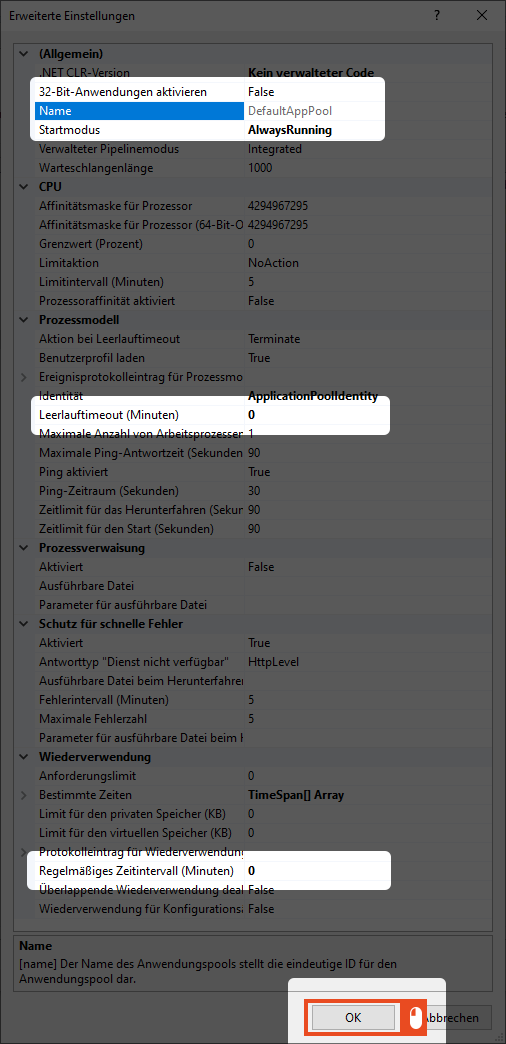
Please compare your settings with those in the following example to ensure proper functionality. Make sure that the following settings are identical and confirm everything with Ok. This completes the installation of the Enterprise Glossary.
.NET CLR-Version | = | No managed code |
Enable 32-bit applications | = | False For a 32-bit system, this parameter should be set to true |
Start mode | = | AlwaysRunning |
Idle timeout (minutes) | = | 0 |
Regular time interval (minutes) | = | 0 |
Windows Authentication for the Database
If you do not want to use SQL Authentication to connect to the SQL database, but instead want to connect via Windows Authentication, you have to make sure that the Windows account specified under Process Model > Identity has access and authentication rights to that SQL Server instance. The options for connecting to the database can be found during the setup process that starts the first time you run the application.
When using Integrated Security with Internet Information Server (IIS) and SQL Server, here are the key points to consider:
IIS and Integrated Security: IIS websites run by default using the ApplicationPoolIdentity, a low-privileged virtual user. When using Integrated Security with SQL Server, the website may not be able to access the database. It's recommended to use a separate domain account for better control.
Enterprise Glossary User Account: Creating a domain account, such as IIS_EnterpriseGlossary, and configuring the IIS Application Pool to use this custom account can allow the Enterprise Glossary to access the database.
SQL Server Permissions: After creating the custom account, it's important to add the login to the SQL Server instance and grant the necessary permissions, such as db_datareader and db_datawriter roles for the relevant database.
These steps ensure that IIS and SQL Server can work together seamlessly with Integrated Security.
If you wish to use Integrated Security, you need to ensure that the necessary configurations are in place for both IIS and SQL Server to allow seamless authentication and access to the database.
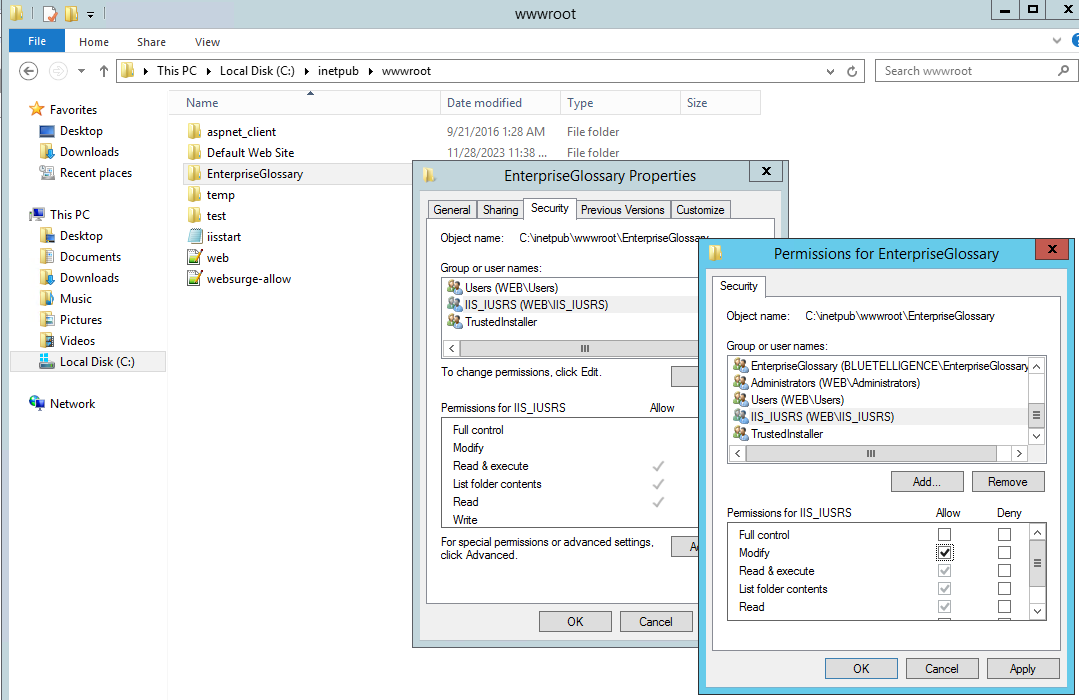
8. Windows Account rights
Before starting the application, you must make sure that the user account under which the application pool runs, has Modify rights on the folder where Enterprise Glossary is installed.
For this, go to the location of Enterprise Glossary folder (usually under C:\inetpub\wwwroot), right click that folder and select Properties > Security. Check if the user is present in the list and that it has Modify access right.
If the user is not already present in the list or does not have Modify access right, press Edit and add the user with the mention right. Read & execute, List folder contents and Read will automatically be add also. Press Ok on all screens to save settings.
9. Run Enterprise Glossary
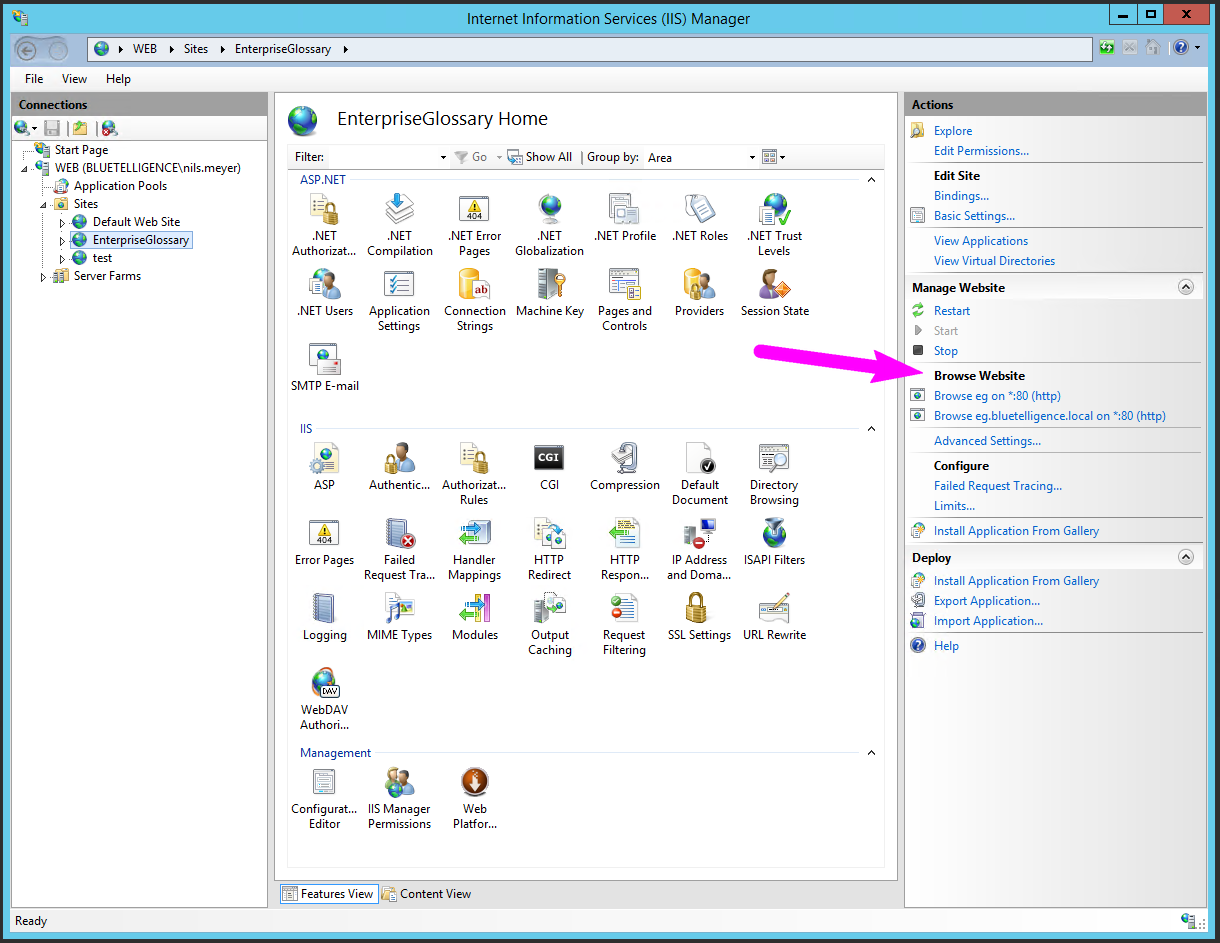
You should now be able to run Enterprise Glossary and go through the initial setup. You can launch the application either directly in your browser or through IIS by selecting the site and selecting Browse Website in the Actions on the right side of the IIS window.
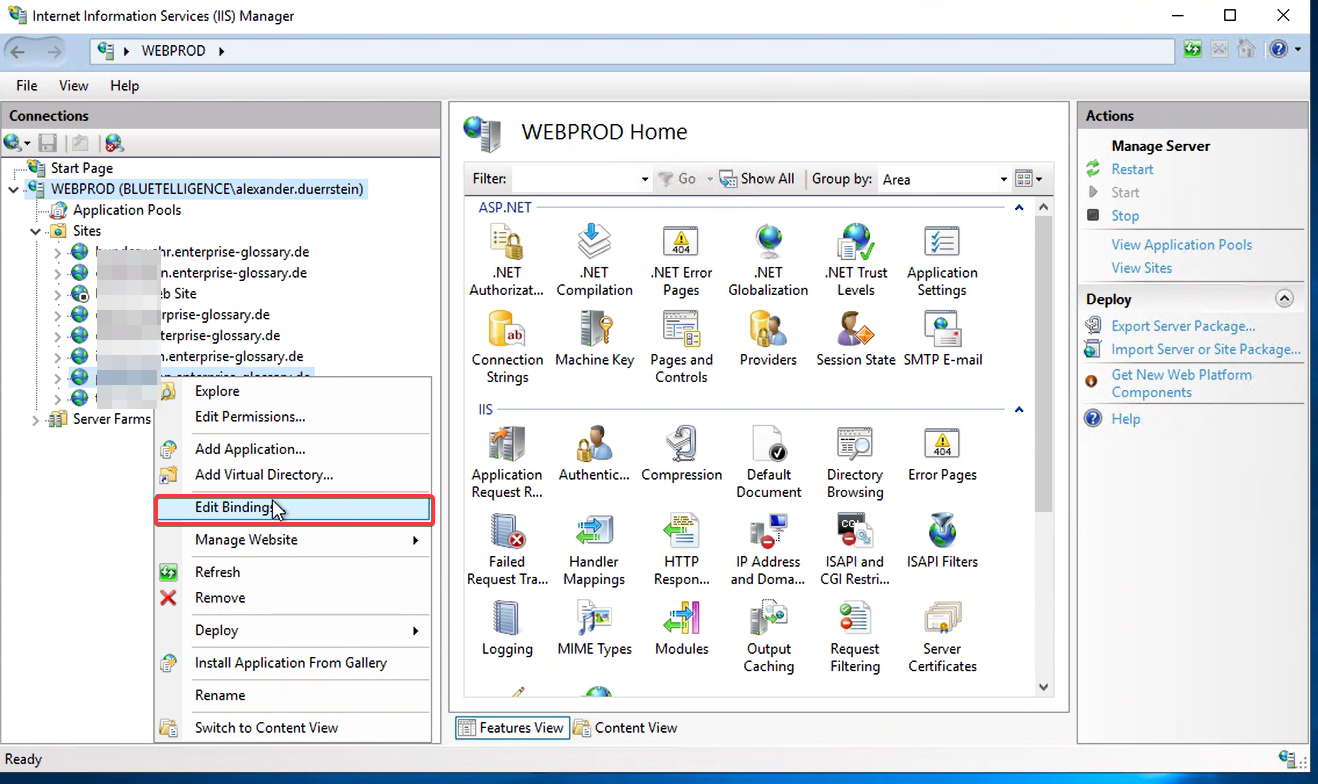
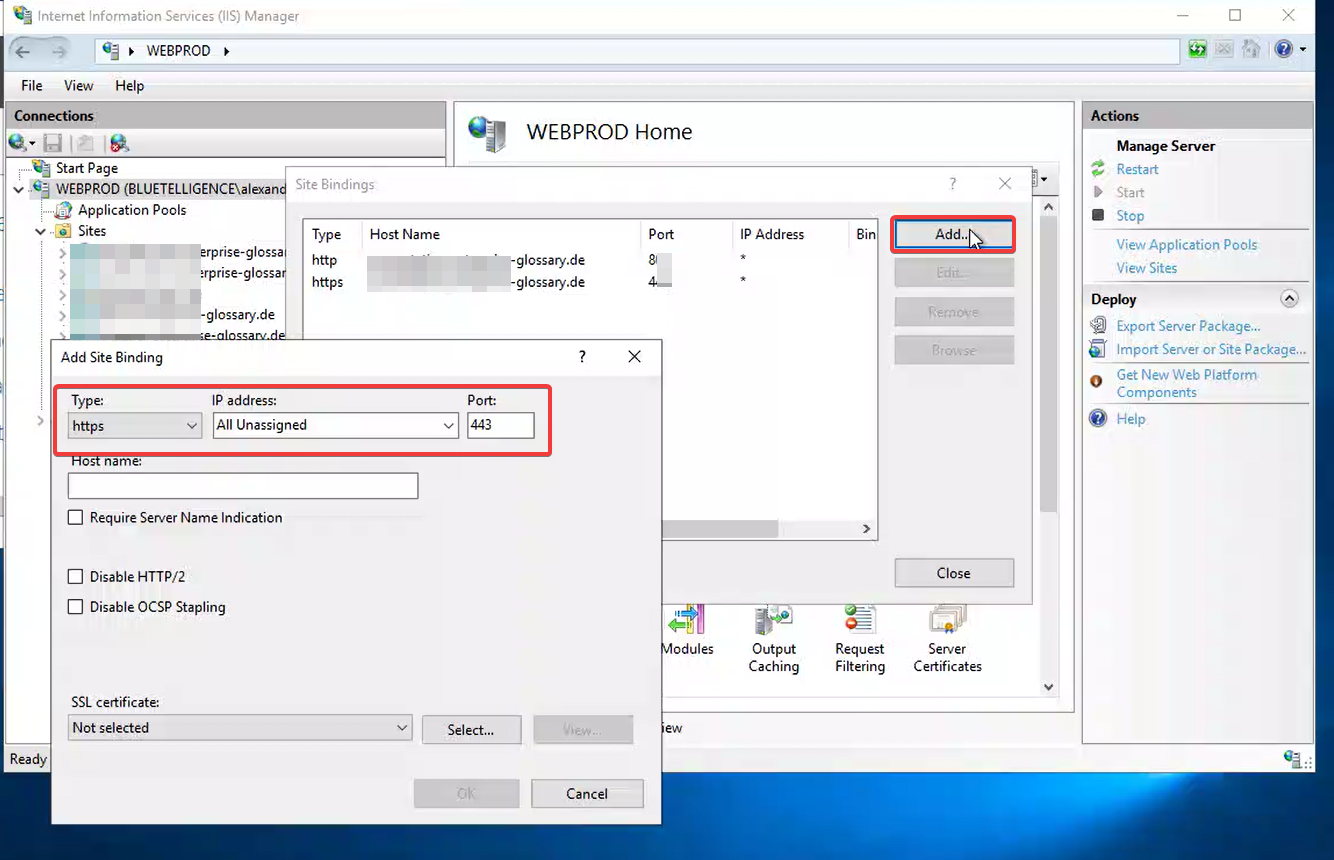
Site bindings must be added so that users can access the Enterprise Glossary via a defined URL.
You must then enter the host name. You can also set https, in which case a certificate is required:
Further information about IIS can be found here: https://learn.microsoft.com/de-de/iis/get-started/getting-started-with-iis/getting-started-with-the-iis-manager-in-iis-7-and-iis-8
For troubleshooting, please visit our Knowledge Base:
Enterprise Glossary Knowledge Base
Not found what you were looking for? Submit a ticket to the Service Desk:
https://support.enterprise-glossary.de/
