
Installation Enterperprise Glossary & Sync Service
This page includes a Step-by-Step installation Guide, a manual to configure the synchronization service and other helpful information about.
What's Inside the ZIP
The ContainerEG_<Version>.zip file contains everything needed to run the application in containers without internet access (air-gapped / offline).
File / Folder | Purpose |
|---|---|
| Pre-built Docker/Podman image for the web application |
| Pre-built Docker/Podman image for the sync service (may be absent if not built) |
| Compose definition for both services, volumes, and networking |
| All configurable settings (ports, image tags, secrets) |
| Launch script for Docker (Windows or Linux with PowerShell) |
| Launch script for Podman (Windows or Linux with PowerShell) |
| Stops the Docker stack |
| Place your TLS certificate ( |
| Quick-start reference |
Step-by-Step Setup
Pick a Deployment Folder
Choose any folder where you want to install EG. Throughout this guide, this path is referred to as <deployment-folder>.
Extract the Build
After downloading the ContainerEG_<Version>.zip file and extract the folder into <deployment-folder>:
Windows PowerShell:
Expand-Archive -Path "<path-to>\DockerBuild.zip" `
               -DestinationPath "<deployment-folder>" `
               -Force
cd "<deployment-folder>"
Linux:
unzip DockerBuild.zip -d <deployment-folder>
cd <deployment-folder>
After extraction, the folder should contain:
<deployment-folder>/
├── enterpriseglossary-<version>.tar
├── enterpriseglossary-sync-<version>.tar
├── docker-compose.yml
├── .env
├── run.ps1
├── run-podman.ps1
├── stop.ps1
├── certs/
└── README.md
If the Certs folder does not exist, create it.
Provide the TLS Certificate
EG runs over HTTPS and needs a .pfx file. For a first-time install
If your organization already provides a certificate use this one or create your certificate.
The filename must be
eg.pfx.Note the password — you'll need it in section 3.
Copy it to:
<deployment-folder>/certs/eg.pfxConfigure .env
Open <deployment-folder>/.env in any text editor and set CERT_PASSWORD to the password of your eg.pfx:
# Generated by TeamCity
IMAGE_REGISTRY=localhost
IMAGE_WEB_NAME=enterpriseglossary
IMAGE_SYNC_NAME=enterpriseglossary-sync
IMAGE_TAG=1.2.3
PROJECT_NAME=enterpriseglossary-project
# Ports exposed to the host
WEB_HTTP_PORT=8080
WEB_HTTPS_PORT=8443
# Container ports (do not change unless the app listens on other ports)
CONTAINER_HTTP_PORT=8080
CONTAINER_HTTPS_PORT=8443
# Secrets
CERT_PASSWORD=ChangeMe123! <-- change to your password set in the .env
JWT_SECRET_KEY=<keep the value generated by the build>
*See Configuration Reference bellow for details.
Start the Stack
Start the stack within your deployment folder using the Powershell script run.ps1.
Using the Powershell directly in Windows:
Using Docker:
.\run.ps1Using Podman:
.\run-podman.ps1
From the Terminal (using Powershell):
Using Docker:
pwsh ./run.ps1Using Podman:
pwsh ./run-podman.ps1
Both scripts accept optional parameters:
Parameter | Default | Description |
|---|---|---|
|
| Path to an alternative |
| (off) | Tears down and recreates containers even if already running |
no parameter |
| both containers will be created |
EgWeb |
| only the web container |
EGSync |
| only the sync container |
EgWeb -EgSync |
| both containers, like when no parameter is used |
Examples:
# Use a custom env file
.\run.ps1 -EnvPath ".\staging.env"
# Force-recreate containers
.\run.ps1 -ForceRecreate
# Podman with force-recreate
.\run-podman.ps1 -ForceRecreate
You might have to load the images manually before running the stack:
docker load -i .\enterpriseglossary-<version>.tar
docker load -i .\enterpriseglossary-sync-<version>.tar
Verify
Once the script finishes, open a browser:
Protocol | URL |
|---|---|
HTTP |
|
HTTPS |
|
Replace
8080/8443with whatever you set in.env.
Stop the Stack (perform only when necessary)
Docker:
.\stop.ps1
# or manually:
docker compose down
Podman:
python -m podman_compose --project-name enterpriseglossary-project downConfigure Synchronization Service
The service must first be configured to connect to the desired Enterprise Glossary. In the following steps <container-name> refers to the name of the synchronization service container (e.g.enterpriseglossary-syncservice).
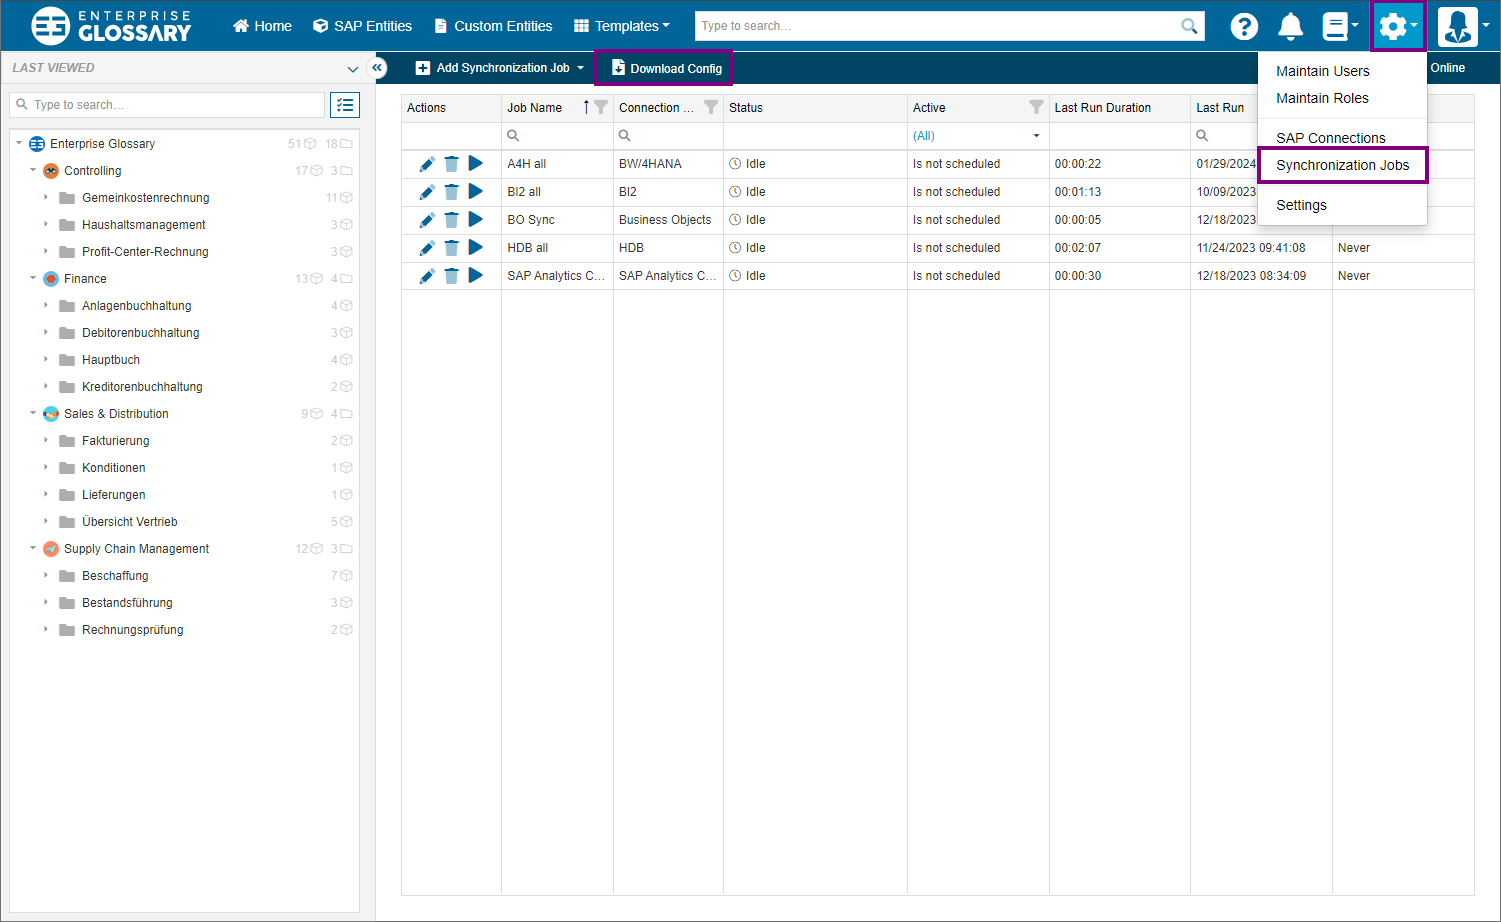
Download Config.xml
Log in to the Enterprise Glossary with an administrator user. In the settings menu in the upper right corner click Synchronization Jobs and then Download Config to download the configuration file for the synchronization service.
Adjust Config.xml
Open the downloaded Config.xml file in a text editor and replace localhost with web in the URL field:
<!-- Before -->
<Url>https://localhost:8443/</Url>

<!-- After -->
<Url>https://web:8443/</Url>
Find the container name
To find the exact name of the running synchronization service container, run one of the following commands:
Docker:
docker ps --filter "name=sync" --format "{{.Names}}"Podman:
podman ps --filter "name=sync" --format "{{.Names}}"Copy Config.xml into container directory
Copy the modified Config.xml file into the configuration directory of the running enterpriseglossary-syncservice container (use the container name you’ve determined in the last step) :
<container-name>:/app/config/
Example commands to copy the adjusted Config.xml into the directory:
Docker:
docker cp /home/<username>/Config.xml <container-name>:/app/config/Config.xmlPodman:
podman cp /home/<username>/Config.xml <container-name>:/app/config/Config.xmlRestart Synchronization service
Finally, restart the synchronization service container for the changes to take effect:
Docker:
docker restart <container-name>Podman:
podman restart <container-name>Configuration Reference - .env Settings
Variable | Default | Description |
|---|---|---|
|
| Image registry prefix. Do not change for offline deployments — the TAR images are tagged with |
|
| Name of the web image (must match the |
|
| Name of the sync service image (must match the |
| (build version) | Image version tag (e.g., |
|
| Compose project name. Useful if running multiple instances side-by-side — give each a unique name. |
|
| Host port mapped to the web container's HTTP endpoint. Change if |
|
| Host port mapped to the web container's HTTPS endpoint. Change if |
|
| Port the app listens on inside the container. Do not change unless the application was built with a different port. |
|
| Same as above, for HTTPS. Do not change unless explicitly instructed. |
| (set by build) | Password for the |
| (set by build) | Secret key used for JWT token signing. Must be consistent across restarts to keep user sessions valid. |
Services & Volumes
Web Service (enterpriseglossary-web)
Setting | Value |
|---|---|
Restart policy |
|
Memory limit | 14 GB |
Memory reservation | 12 GB |
Health check |
|
|
|
Volumes:
Volume | Mount Point | Purpose |
|---|---|---|
|
| Application data (database files, config) — persistent |
|
| User-uploaded files — persistent |
|
| TLS certificate ( |
Sync Service (enterpriseglossary-syncservice)
Setting | Value |
|---|---|
Restart policy |
|
Memory limit | 5 GB |
Memory reservation | 512 MB |
Depends on |
|
Command |
|
Volumes:
Volume | Mount Point | Purpose |
|---|---|---|
|
| Sync configuration ( |
|
| Sync service log files — persistent |
Environment variables set inside the sync container:
Variable | Value | Purpose |
|---|---|---|
|
| .NET hosting environment |
|
| Enables HTTP/2 for gRPC / SignalR communication |
|
| Ensures native SAP libraries are found |
Accessing Volume Data on the Host
Docker and Podman store named volumes in internal directories. To inspect or edit files:
# Docker — find the volume mount point
docker volume inspect enterpriseglossary-project_sync-config
# Copy Config.xml into the volume
docker cp ./Config.xml enterpriseglossary-syncservice:/app/config/Config.xml
# Or use a temporary container
docker run --rm -v enterpriseglossary-project_sync-config:/data -v $(pwd):/src alpine \
  cp /src/Config.xml /data/Config.xml
Common Scenarios
Change Ports
Edit .env:
WEB_HTTP_PORT=9090
WEB_HTTPS_PORT=9443
Then restart:
.\stop.ps1
.\run.ps1
Run Multiple Instances Side-by-Side
Extract the ZIP into a separate folder.
Edit
.env— changePROJECT_NAMEand ports to avoid conflicts:CODEPROJECT_NAME=eg-testing-instance2 WEB_HTTP_PORT=8081 WEB_HTTPS_PORT=8444Run
.\\run.ps1from that folder.
Use a Different Certificate
Replace
certs/eg.pfxwith your new file (keep the filenameeg.pfx).Update
CERT_PASSWORDin.envto match.Restart the stack.
Connect to a Database on the Host Machine
To connect with a Database use the IP-Address of the Server where the Database is running on in your connection string.
The compose file maps host.docker.internal to the host gateway. So alternatively you can use host.docker.internal as the server address in the application's connection string (instead of localhost).
Troubleshooting
Symptom | Possible Cause | Fix |
|---|---|---|
| Script not run from the deployment folder |
|
"Missing image TAR" | TAR file not next to the scripts | Ensure |
Port conflict ("address already in use") | Another process uses 8080/8443 | Change |
HTTPS certificate error in browser | Self-signed or untrusted cert | Expected for test certs — click through the warning, or import the CA |
Health check failing | App still starting or cert mismatch | Wait 60 s; verify |
Podman: "podman_compose module not found" |
| Run |
Sync service keeps restarting |
| Place a valid |